Support
Technical Support is available Monday - Friday, 8:30 AM - 8:00 PM ET.
Phone: +1-704-227-2629
Email: [email protected]
Schedule a DemoOverview
MiPACS technical support and software maintenance is available for an annual renewal fee beginning upon the installation date of the MiPACS software.
Technical Support
Technical support provides the customer with the ability to call MiPACS support desk to report problems, receive technical support, and answer any questions about MiPACS components. MiPACS technical support includes remote diagnostics, configuration, and problem resolution using our ScreenConnect portal, Microsoft Teams, Zoom, and more. Technical support is provided on an unlimited basis, so long as it is renewed annually.
Technical Support tickets can be accessed at support.mipacs.com, where you can create and monitor tickets, send messages, and access your full ticket history, including those submitted by email. The portal also lets you adjust settings to provide valuable context for our support team. Technical support is available during normal business hours by telephone, email, and online portal. If technical support is required after normal business hours, it can be scheduled ahead of time.
Software Maintenance
Software maintenance includes access to new versions, updates, and patches to the MiPACS components as they are released. Bug fixes and enhancements, including any approved feature requests made by users, are provided in these updates. Maintenance releases will be provided electronically via download links upon request.
Never work alone! Remote Support options available:
- ConnectWise/ScreenConnect, Microsoft Teams, Zoom, and more
- Remote Trainings
- Project Planning
- Upgrades
- Migrations
Additional Resources
Full End-User Training available on YouTube.
MiPACS Newsletter
Tips and Tricks

Removing Listed Templates in MiPACS
Learn how to remove listed templates in the MiPACS Dental Enterprise Viewer
Q: MiPACS template list has more templates than we need. How do I delete unused templates from the list?
A: Only a MiPACS application administrator can make changes to both default and custom templates by doing the following:
Delete a Template
To delete a custom template, simply go to the MiPACS Template Editor, click on the template name, and then press the DEL key on the keyboard. Although the default templates included with MiPACS cannot be deleted, they can be hidden so that they are not visible to users.
Hide a Template
You can also prevent any template from being displayed to users (without deleting it) by hiding the template. To do this, click on the template name and then change the value of the Hidden property to Yes in the Properties pane.

AE Titles Last Access Date (Storage Server v3.0.0.2)
View an AE titles last access date (Storage Server v3.0.0.2)
One of the new additions to MiPACS Storage Server v3.0.0.2 is that AE titles can now have a “Last Access” date. This is very useful for customers who manage a large amount of AE titles.
Contact our Support team if you are interested in learning more about MiPACS Storage Server v3.0.0.2!


Import Non-DICOM Images into MiPACS
Learn how to import non-DICOM images into MiPACS.
Option 1: Use Windows Clipboard
- If you have access to the Windows clipboard, select the image(s), right-click, and click copy (use CTRL to select multiple images)
- Open the patient in MiPACS and select a template
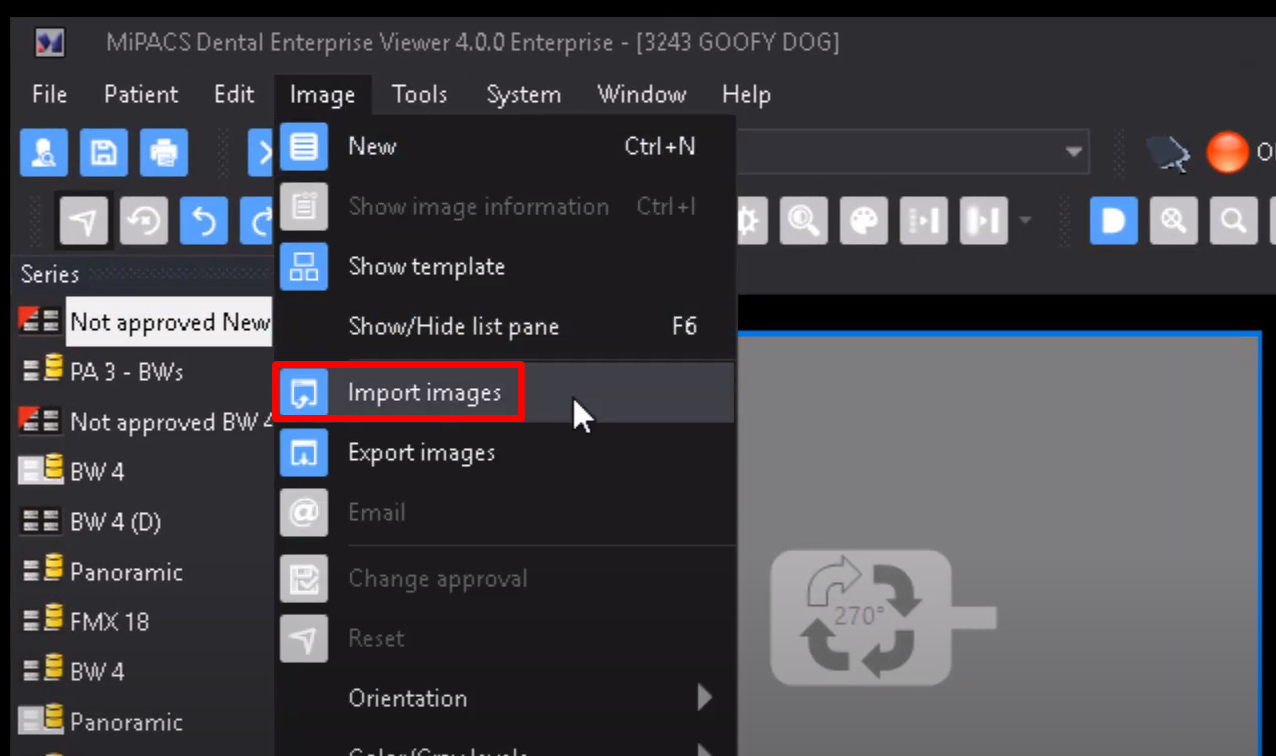
- In the top menu bar, select Image > Import Images
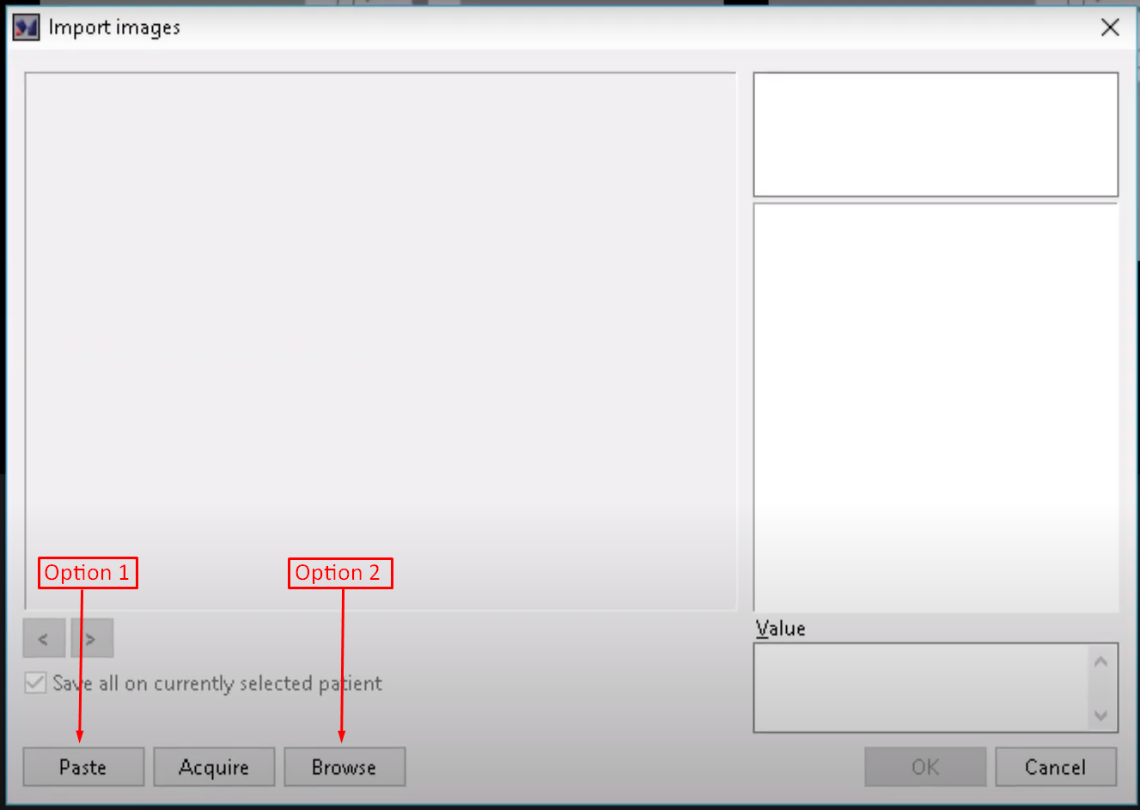
- In the pop-up screen, select Paste
- Select okay to finalize the import
- Adjust/rearrange the images as necessary
Option 2: Save Images to Hard Drive
- Save the images you want to import and put them in an easy to locate place
- Open the patient in MiPACS and select a template
- In the top menu bar, select Image > Import Images
- In the pop-up screen, select Browse
- Navigate to the images you want to import and select the images (use CTRL to select multiple images)
- Select okay to finalize the import
- Adjust/rearrange the images as necessary
Video instructions can also be found on Medicor Imaging’s YouTube Page

Measurement Calibration
Learn how to calibrate measurements via DPI in the MiPACS Dental Enterprise Viewer.
Click here to go to dedicated page with a walk through!

Locating a Deleted File
Learn how to find and recover an accidentally deleted image.
Click here to go to dedicated page with a walk through!

Mach Effect Correction
Learn how to use Mach Effect Correction to remove false shadows in images.
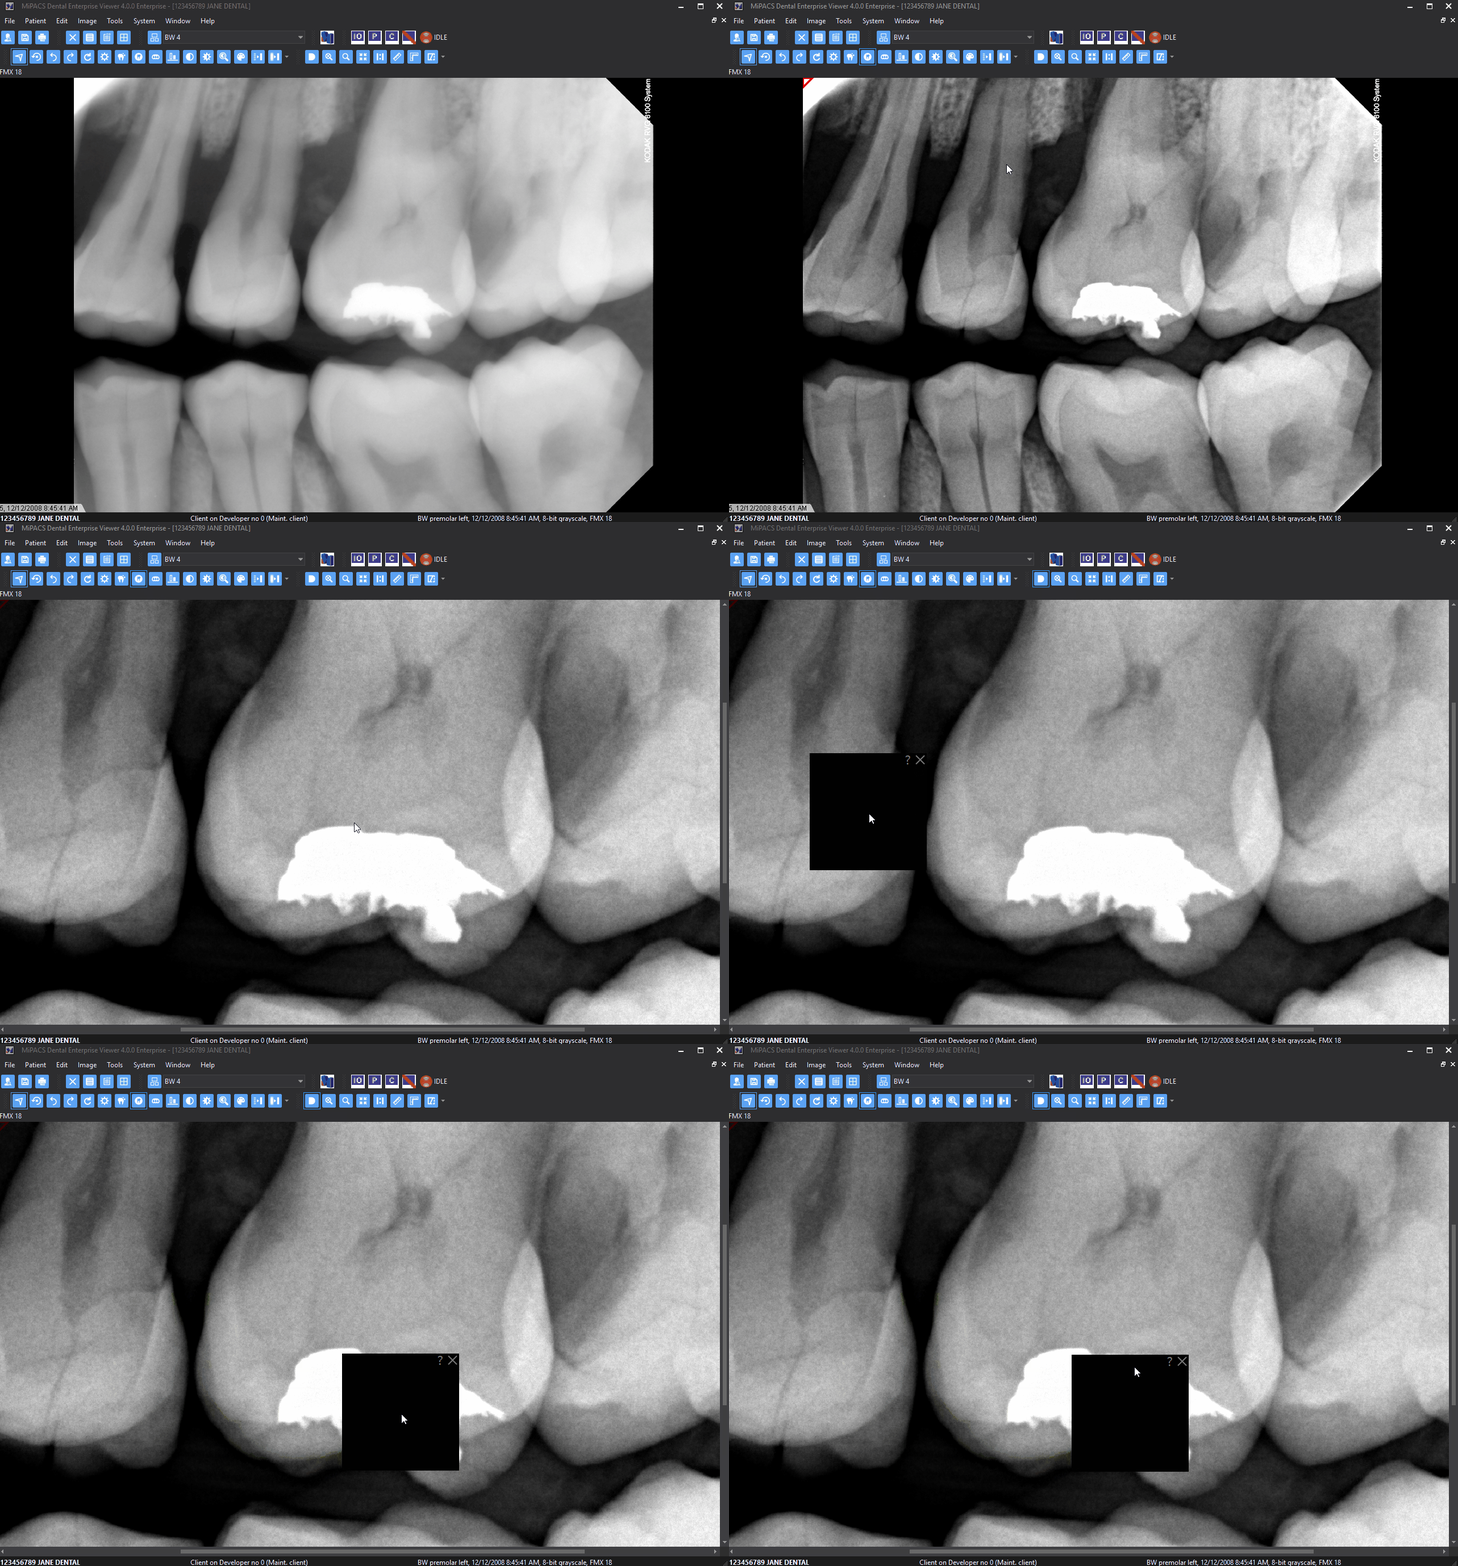
The Mach refers to an optical phenomenon where the inbuilt edge enhancement mechanism of the retina (where the edges of darker objects next to lighter objects will appear lighter and vice versa) create a false shadow ("Mach band") in a radiograph. Mach bands generally manifest adjacent to metal restorations or appliances and the boundary between enamel and dentin. This effect has been attributed as a source of diagnostic error in radiology.
By covering up the lighter object, such as a restoration, with a black square, one can reduce this effect and see the actual shade of gray present within the image pixel data without the brain trying to enhance the differentiation. For optimal results, the black square in the Mach effect correction tool should be angled parallel to the edge of the object and sized accordingly to cover it up.
To access this feature, simply look for this icon on the toolbar: ![]()

Moving Unapproved Images from Wrong Patient to Correct Patient
Learn how to move images to the correct patient.
Did you take images on the wrong patient? Don't panic! If you have NOT approved the images yet, this is an easy fix!
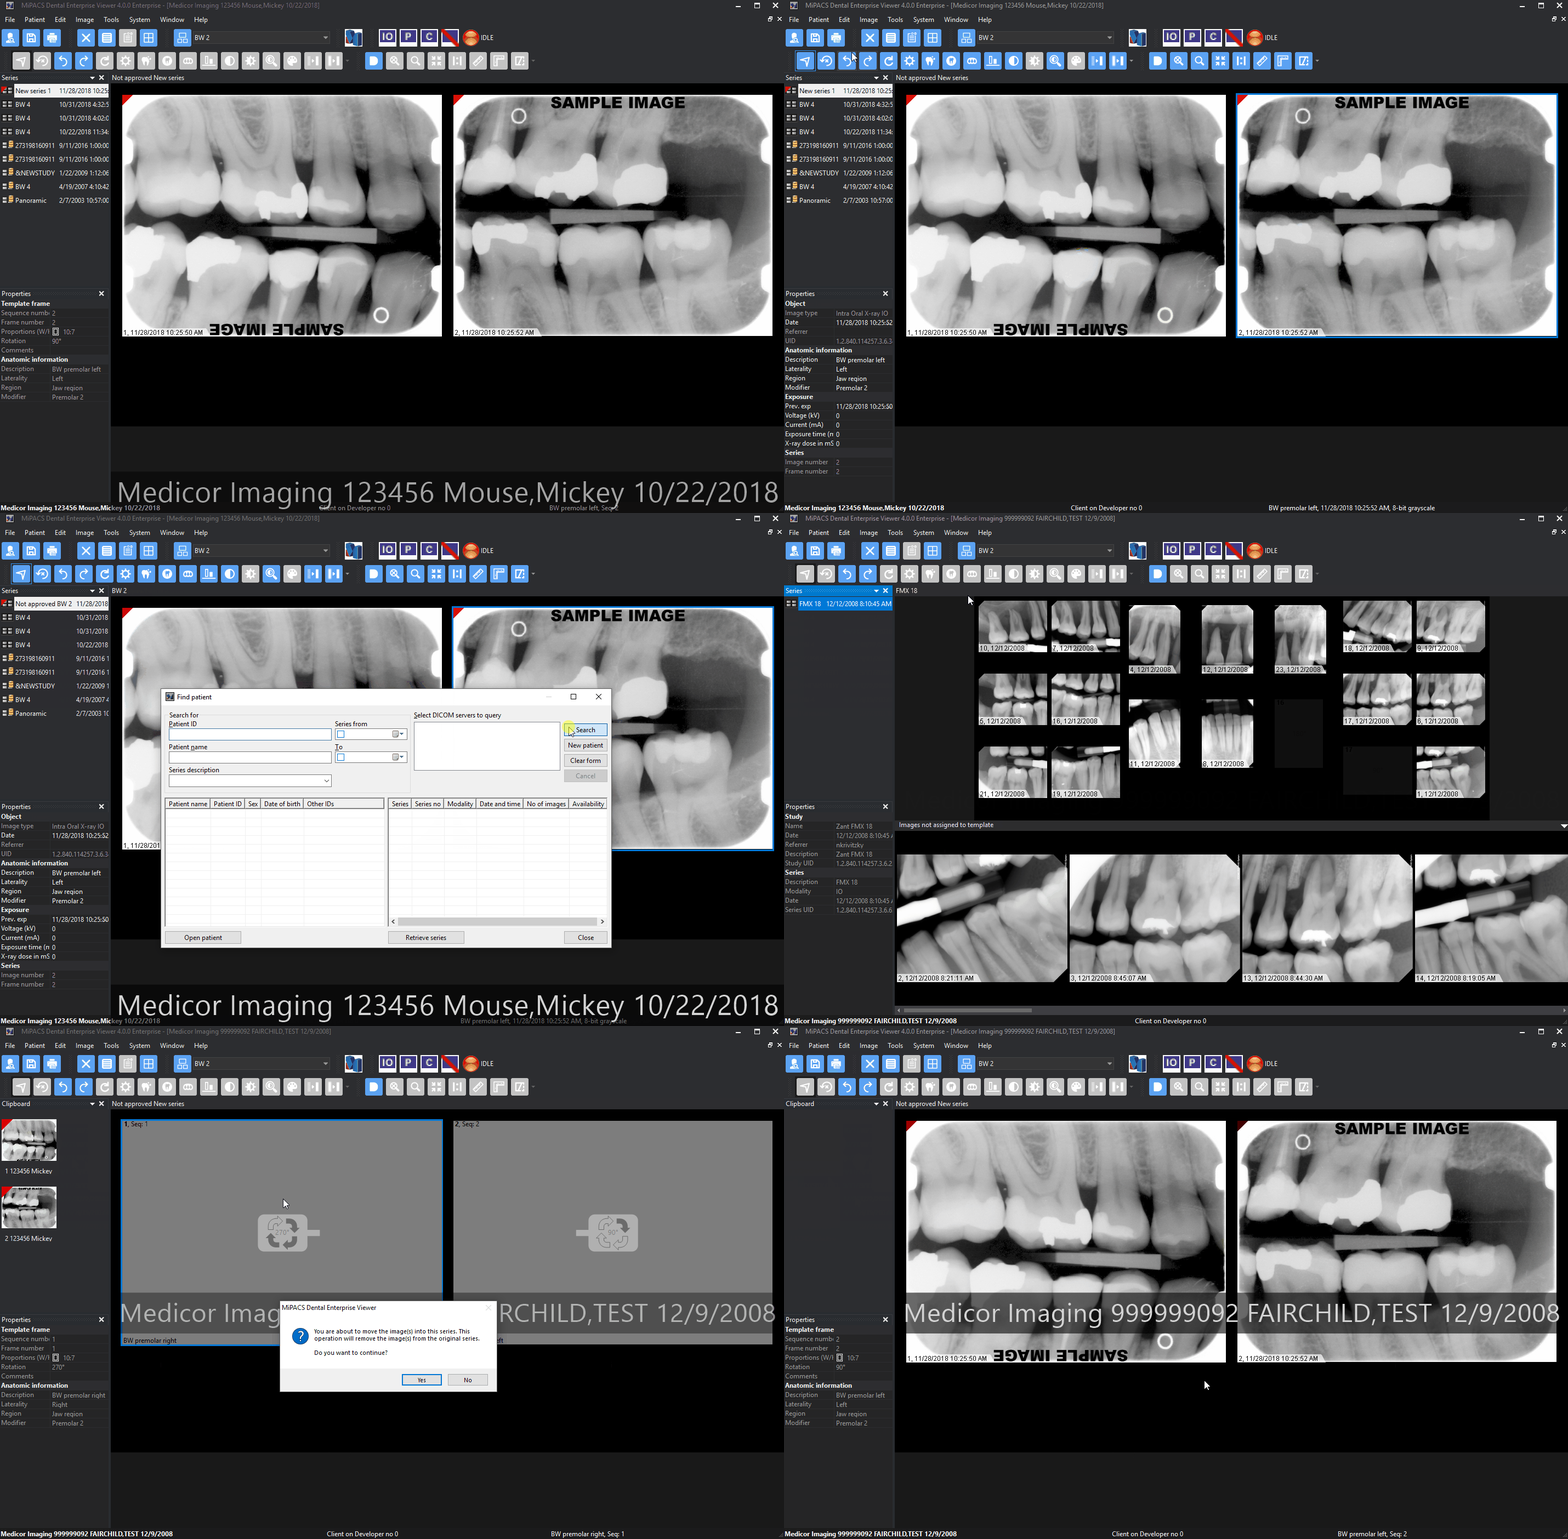
Simply follow these steps to move the images to the correct patient:
- Do not approve the images until they are in the correct patient record.
- Open MiPACS to the patient record where the images currently reside (i.e., the incorrect patient record).
- Select the image(s) you wish to transfer by left-clicking the image. To select multiple images at the same time, hold the Ctrl key and click on each image to select them, or press Ctrl + A to select all images. A border will appear around the image(s) to designate that they have been selected.
- Once selected, right-click on any selected image and select copy to clipboard.
- After repeating steps 1 & 2 for all images you want to move, open the correct patient.
- In the correct patient, create a new series, as if you were going to take images.
- After the series has loaded, click the down arrow above the series list on the left (or right, if configured that way).
- Open the clipboard by selecting Clipboard. Here, you will find the images you copied to the clipboard.
- You can now select the images you wish to transfer. Left click the images to select. You can select multiple images by holding down the Ctrl key and left-clicking each image.
- Simply drag and drop the images into the series.
- After dragging and dropping the images, the MiPACS Viewer will ask if you want to move the image(s) into this series and if you wish to continue. Hit Yes.
In the animation below, moving images from MOUSE, Mickey (incorrect patient) to FAIRCHILD, TEST (correct patient) is demonstrated.

Using the Patient ID Banner
Learn how to use the Patient ID Banner in the MiPACS Dental Enterprise Viewer.
Click here to go to dedicated page with a walk through!

How to View Templates in Full Screen
Learn how to use the full screen view of an entire template.
A full screen view of the entire template can now be viewed by selecting Tools > Template Full Screen or by selecting F8 on the keyboard.
